Install Adobe CC - Mac OS

Please follow this guide to install the latest Adobe Creative Cloud suite on your BYOD device.
You will need your eduPass login credentials, if you are unsure or do not have this. Please contact IT@tlsc.vic.edu.au for assistance.
If this page does not display correctly, please download the guide HERE
Make sure to have MacOS 10.13 High Sierra or above. In this tutorial, we will be installing this program on the latest MacOS v11.2 - Big Sur.
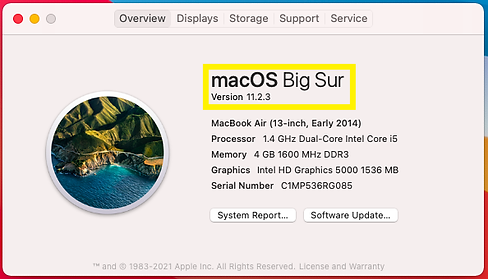
1. Firstly, check which MacOS you are currently running to avoid compatibility issues. Click on the Apple icon on the top left>About this Mac.
2. As mentioned above, we are using the latest MacOS v11 - Big Sur for this tutorial. Your MacOS needs to be running v10.13 or above for the installation to work.


3. Click on the Adobe logo to open the Adobe website.
4. On the top-right corner of the website, click 'Sign In'.

5. Proceed to sign in with your department student email and click 'Continue'.
Note - This is your eduPass email, it is NOT your school email. Your eduPass email will need to include example@schools.vic.edu.au

6. Enter your eduPass password - if you do not know this password, you can find for it in your TLSC student email searching for 'eduPass'. Alternatively, you can email it@tlsc.vic.edu.au for assistance with this password.

7. Tick on 'Don't show this again' and click on 'Yes'.

8. On the main page, under Creative Cloud, select open.

9. Click on the Creative Cloud icon on the top bar. Note: Do not download Photoshop; we will be using the Creative Cloud application to control the installation of the Adobe suite.

10. Download the Creative Cloud application.

11. A new window will open and the Creative Cloud setup will start to download; once finished, click to open the setup file.

12. Double click on the Creative Cloud Installer icon.

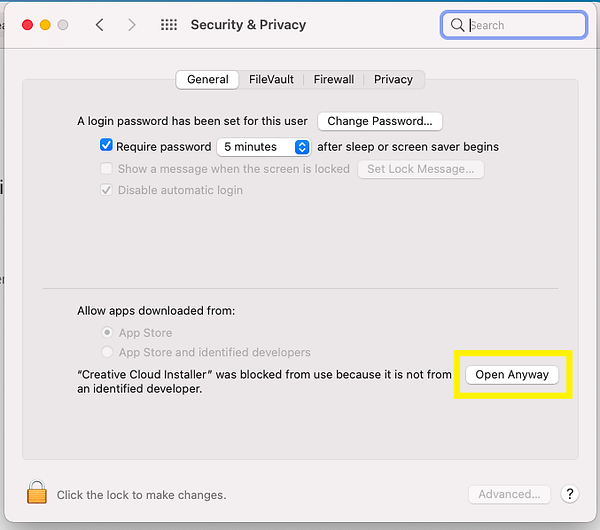
13. You will need to allow 3rd party software installations on your MacOS to continue. The next few steps will show you how. Select 'OK' on the dialog box.

14. Click on the Apple icon (on the top left) and select System Preferences.

15. Click on the Security & Privacy.

16. Under Allow Apps Downloaded From, click on the Open Anyway.
17. Select Open.
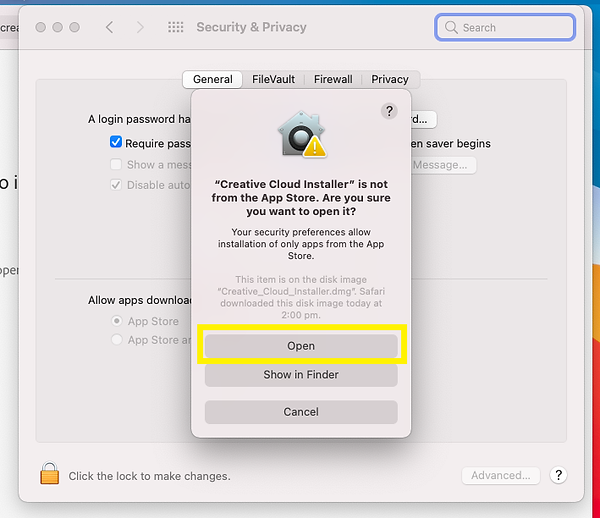
18. Select OK.

19. Click Continue to install the program.

20. You will be prompted for the system (computer login) password - please enter that in to proceed.

21. At this stage your Internet browser may (or may not) open to authenticate your eduPass credentials. Please enter those credentials to proceed. A window will appear to acknowledge your sign in - you can close this window.

22. Adobe Creative Cloud will begin to install, please wait patiently.

23. Once installed, the Adobe Creative Cloud application will open. Select your desired program by clicking the Install button. In this example, we will be installing Photoshop.

24. Please wait patiently while the program is installing.

25. Once installed, you can 'Open' the program.

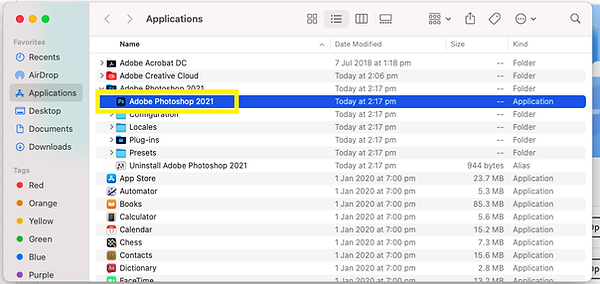
26. Another way to locate the Adobe program is to search for it under the Go Menu>Applications.

27. Expand the Adobe Photoshop 2021 directory and double click on the Adobe Photoshop 2021 program.
28. Once you open Photoshop, please wait for your Macbook to Verify to application.

29. Click OK for Photoshop to access your Documents folder.

30. The Adobe Photoshop startup logo will appear.

31. You can now use the program. Under the Help Menu, check to make sure your Adobe suite has been activated and signed in with your student eduPass email address.
